How We Built Our Misting Box
For Propagating Roses
All Photos By Kitty Belendez
There are a number of ways to propagate a rose: by seed, cuttings, budding, grafting, and air layering. Propagating by "cuttings" is the easiest to do and is what we will focus on here for building our misting box.
Why Build a Misting Box?
A properly-built misting box will provide your rose cuttings with good air circulation and a steady supply of moisture to help them grow.
When I first began experimenting with taking rose cuttings over 20 years ago, I would put the cuttings in zippered plastic bags, and then later I tried the bottle method. But, I was not satisfied with the success rate of those methods because the lack of air circulation in bags and bottles created mold and fungus diseases, which killed off many of the cuttings before they could take root.
Around 1996, I convinced my husband Bob to build a misting box. We had no idea how to do it, so we went to see the misting systems of a few friends such as Cal Hayes and Bill Wilke. It was interesting to see how they had built theirs, which gave us a few ideas to get us started.
Mine would be built to suit my own needs, so I began thinking of what I wanted. I explained to Bob what I needed, and he then designed and built it. I must admit that we went through a few trial and errors. Our misting box was not perfect at first, and in fact we are constantly tweaking and perfecting it.
Choose the Location
You need to select a site that is in full sun most of the day, or even partial sun, but never in full shade.
In the beginning, we erected our misting box close to the house in January, which turned out to be too near to a peach tree. By spring, when the peach tree had completely leafed out, the misting box was almost in total shade, which is not good because most of the cuttings were molding and rotting before they could take root. So we selected another site, almost in full sun, although it was 10 feet farther away from the house, and moved the misting box. We did not want to locate the misting box in the middle of the rose garden, because we knew it would be a distraction and not be that attractive in an otherwise beautiful garden. Our new site was located up against a block wall that was behind swimming pool equipment at the back of the yard, and therefore partially hidden but easily accessible, and yet getting sun for most of the day.
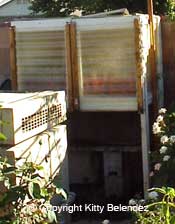
Designing The Box
Choose a design that will suit your own personal needs.
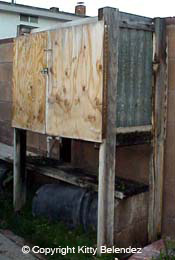
I knew I wanted a small misting box because I have limited space in my yard. But I also wanted plenty of room inside the box to be able to hold at least 100 cuttings at any one time. So, we decided that our misting box should be able to hold two 18" x 18" nursery flats, and we would build the misting box around those dimensions. Each nursery flat holds fifty 2-inch pots, and each pot can hold 1, 2, or 3 cuttings.
I also knew that I do not like bending over or getting on my knees when working with my roses. So we decided that the misting box would stand up on four legs so that I could easily work with the cuttings at waist height while standing.
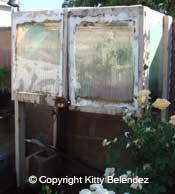
I wanted a door that was easy to open and close. Because of space limitations, at first we built a door that was hinged at the top, but it kept falling down on my head while working in the misting box. We eventually changed over to side-swinging double doors, which are much better (and easier on my head).
For the floor inside the box, we wanted to have good drainage. We could have made the floor out of wooden slats or wire mesh, but we chose instead to use two old stainless steel refrigerator racks. These are perfect because the nursery flats can drain easily, and air circulation can come up through the racks. And, the metal racks should last longer than wooden slats, which would have a tendency to rot.
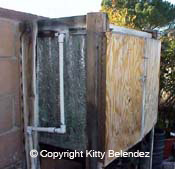
The first year we used polyethylene plastic film for the walls of the misting box. This proved to be a bad choice because the film did not hold up and within one year had to be replaced with rigid corrugated siding -- a much better choice.
Materials We Used
Schedule 40 irrigation pipe, the length will depend on how far you locate your box from your water source.
Misting Head
Saddle to attach mister to pipe
Timer or Mist-A-Matic Unit
Wood for the frame and legs:
Four 2" x 4" x 5' (legs)
Four 2" x 4" x 20" (sides)
Four 2" x 4" x 36" (front/back)
Latch and hook for the door
Clear plastic for sides, top, and doors:
Two 26" x 13" (sides)
One 26" x 39" (back)
One 33" x 23" (top)
Two 25" x 19-1/2" (doors)
Scalloped wood braces for attaching the corrugated walls:
Four 12" pieces for the side walls
Two 26" pieces for the back wall
32 screws for the scalloped wood
Nails
Two 18" x 18" plastic nursery flats
Hinges for the doors
Screws for the hinges
Old refrigerator racks, or wooden slats, or wire mesh for the floor
Tools Needed
Hammer
Drill
Screw Driver
Saw
Tape Measure
Building the Box
1) Start building the frame by nailing the four 5-foot legs onto the four 2" x 4" x 20" side braces, placing two braces at the top, and two positioned at about 32" from the ground.
2) Next, securely attach the legs and side braces onto the 36" front and back cross braces.
3) Attach the clear corrugated walls to the sides, top, and back, leaving the front open until you build the door. We used scalloped wood braces, which fit over the corrugated walls to hold it into place with screws.
4) Now attach the two doors with the hinges and screws.
5) Place the wire refrigerator racks onto the floor of the box (or you will need to attach a slatted wood floor or wire mesh if you don't have wire racks).
6) Place the plastic nursery flats on top of the flooring.
7) Now bring the misting box to its location and prepare to install the plumbing, misting head, and timer.
Plumbing/Irrigation
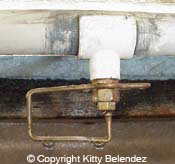
You will need to run some Schedule 40 PVC irrigation pipe from your water source to your misting box. So the length needed will depend on how far your misting box is located from the water source. The pipe will then run up to the top and then inside of the misting box. You will have to cut a hole into the side of the box into which the PVC pipe will be placed. Then drill a hole into the center of the pipe, where you will install the misting head.
Misting Head
At first we tried those little misting heads that you use on your patio to keep it cool. These plugged up often and proved to be too much trouble as we were often cleaning them out -- a waste of time and money. We eventually changed over to a Dramm Misty-Mist #34-MI/36 PSI. They were purchased for 73 cents each and only rarely need to be cleaned out (maybe twice a year). We used only one misting head for our small box because each head covers a 3-foot area.
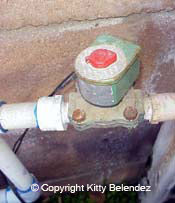
The Timer
When we first set up our rose misting box, we looked through catalogs and took many trips to various hardware stores to see what kinds of timers were available. At first we installed a pair of battery-powered timers, as each one only had four times per day that they could turn on, and we wanted the mister to come on once every hour from 9 A.M. to 4 P.M. Each timer runs on two 9-volt batteries, which need to be replaced twice a year. Another model we tried could not handle our very high water pressure of 120 psi and kept exploding. Other models we experimented with were just not dependable in coming on every hour, and the batteries often failed. These battery-powered timers cost about $45 each.
Eventually we switched over to the Mist-A-Matic system, and we like it a lot. It automatically turns on by sensing the moisture level. It is more expensive and has to be hard wired. But it will be well worth the money as we will not have to buy a timer and replace batteries nor bother with resetting the times throughout the year. We got ours as a hand-me-down from an elderly rosarian friend who retired to a nursing home.
You can locate suppliers of the Mist-A-Matic on the Internet just by typing in Mist-A-Matic in your favorite search engine, such as google.com or yahoo.com.
Here's how the Mist-A-Matic works:
A special stainless steel screen on the handle of the unit raises up when it is dry. When this happens, it throws the mercury switch, which opens the solenoid valve and starts the misting cycle. When this stainless steel screen accumulates enough mist, the weight of the water drops it down again, shutting off the mercury switch, closing the solenoid valve. It needs practically no care or maintenance and can be left on, unattended day and night. This control unit is a very practical instrument, which will have a long lifetime of carefree maintenance. There are no clocks to adjust, and it is not affected by water conditions. It works simply on the weight of water. The major benefit of the Mist-A-Matic is to control the misting cycle according to weather conditions. Too much water promotes disease and wastes water. Too little water causes leaves to wilt and failure to root. The Mist-A-Matic distributes the correct amount of water. In hot weather, the unit will turn on more frequently as the water evaporates. In cooler weather, the unit turns on less frequently. For operation, you will need to plug the unit into an electrical outlet. You need to hook it up to a water source and a misting head.
How to Take Rose Cuttings
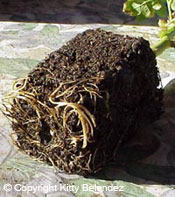
So now that our mister is finished, let's take some rose cuttings. Take a 6-inch cutting from any type of rose (except a patented variety). Remove all sets of leaves except the top two. Fill a 2-inch pot with potting soil. Poke a hole with a pencil, halfway down in the pot. Dip the end of the cutting in a rooting hormone such as Hormex, RooTone, or Dip 'n Grow. I like Hormex the best! Insert the cutting in the soil and tamp the soil tightly around it. Water it well, but do not fertilize it. Place the cutting in the mister, and it should begin to take root within 6 to 8 weeks.
Planting Mediums for Rooting Rose Cuttings
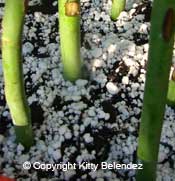
The planting medium that I have found to be the most successful for rooting rose cuttings is a 50-50% blend of sterile potting soil and perlite. This is a very light blend that encourages the roots to grow.
Whatever planting medium you decide to use, the soil needs to stay moist and yet have good drainage.
Other Tips for Rooting Rose Cuttings:
- Use sharp cutters to prevent crushing the rose stem.
- Rooting hormone is optional; but they root quicker with it.
- Label your rose cuttings with their proper name.
- It takes 6 to 8 weeks for the rose cutting to root, depending on the weather.
- Keep the rose cuttings moist at all times, with good air circulation, drainage, and sunlight.
- You can make slits in the bottom inch of the stem to encourage more rooting, but I have found that it works much better with the slits.
- Make sure that the pots you use are very clean. If they are being reused, they must first be washed out with soap and water. An automatice dishwasher works well for this task.
When to Take Rose Cuttings
The best time of the year to take rose cuttings in Southern California is April, May, June, or September, October, and November. July and August are usually too hot as the temperature sometimes soars to over 100 degrees, but I have done it and the success rate is much lower then. I have also taken cuttings in December when our nighttime temperatures sometimes reach freezing, but again, the success rate is lower because it is too cold, and the cuttings take much longer to "strike." If the weather stays mild during November through February, we simply put the cuttings out into direct sun and then water them with a water wand type of hose-end nozzle every day.This timing should work well for most southern states, but in the colder northern states, spring and summer will be the best times to take cuttings.
Winter & Summer Protection
If you're going to take rose cuttings in summer or winter you will need to take some extra precautions. In winter, we cover the top and sides of the misting box with heavy blankets at night to prevent the cuttings from freezing. In the summer (July, August, and sometimes into September) we sometimes cover our misting box with green meshed shade cloth to keep the cuttings cooler if the temperature is over 100 degrees. It will depend on your local weather conditions.
Getting the Most Out of the Misting Box
I use my misting box year-round, so it is always set up and ready to go. It really comes in handy for those times when I come across some rare and unusual roses. When I visit my friends' homes, or go on garden tours, I'm not shy about asking for a cutting of some rare old garden rose, or other unusual, hard-to-find varieties. They know that I will happily reciprocate by giving them cuttings from my garden. When we go on fishing trips, I've been known to bring home cuttings of wild roses such as rosa woodsii, which I have found along the riverbanks. And, since I help to produce two roses shows each year, I always make a beeline to the old garden rose table to grab the stems before they are thrown out at the end of the show. With my misting box I've had the pleasure of growing various types of unusual roses, and I also put many on the raffle tables of my local rose societies for others to enjoy.
Some links for rooting rose cuttings:
© Copyright Kitty Belendez. All rights reserved.
This article was originally published in "Rose Ecstasy," bulletin of Santa Clarita Valley Rose Society, Kitty Belendez, Editor.
Photos © Copyright by Kitty Belendez
For questions about Santa Clarita Valley Rose Society, contact: